Reference
DataNodes of type Variable, Formula and REST Web-service were described above.
In the following, we describe the remaining dataNode types of xDash. Some dataNodes are available in the basic version. Others require the full version.
| Type | Basic version | Full version |
|---|---|---|
| Variable |  |
|
| Formula | |
|
| REST web-service | |
|
| Python script | |
|
| Python inline | |
|
| Generic file reader | |
|
| CSV file reader | |
|
| CSV file player | |
|
| Map matching | |
|
| Trip conversion | |
|
| Geolocation | |
|
| Clock | |
|
| Delay | |
|
| MQTT | |
|
| WebSocket receive | |
|
| WebSocket send | |
Python
Python inline (*) and Python script (*) dataNodes allow the evaluation of a Python script in a Docker image selected on the server side. They have common parameters:
- Docker image : the Docker image used for executing the Python script. Can be customized as indicated in xDash Python Management (*). A default image may be used otherwise.
- Python script : the Python script code. Its result must be serializable to JSON. If omitted, the script must contain at least a 'return' statement.
- Function name : allows to define the specific script function to call at execution. This parameter is optional. If empty, the whole script will be executed.
See examples: * python-inline-make-blobs.xprjson (*) (without function name) * python-inline-interpolate.xprjson (*) (with function name)
- Splat argument : Splat arguments when calling the function (or create local variables). Only works with JSON arrays and objects.
See example
-
python-inline-interpolate-splat.xprjson(*) (with function name)
-
Munchify arguement : Allows attribute-style access to values in argument dictionaries (using the dot notation). See https://github.com/Infinidat/munch
CSV file reader
Reads a CSV file and translates its content to JSON, according to the value of ROW TO ARRAY property :
-
If set to true, each row of the CSV file will be placed into a JavaScript Array.
See example: csv-array.xprjson
-
Otherwise, if set to false, content is parsed as an array of JSON objects.
See example: csv-json.xprjson
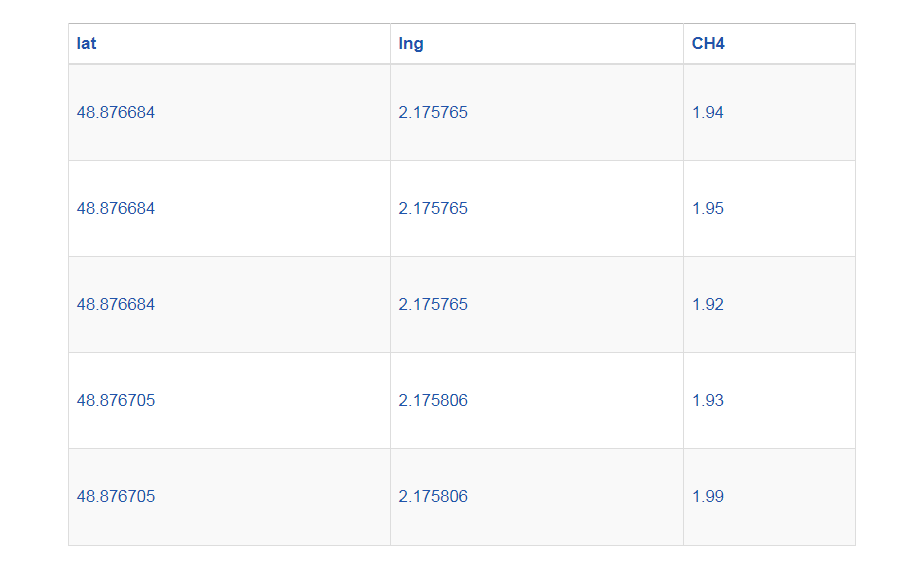
The following CSV:
"lat","lng","CH4"
48.876684, 2.175765, 1.94
48.876684, 2.175765, 1.95
48.876684, 2.175765, 1.92
48.876705, 2.175806, 1.93
48.876705, 2.175806, 1.99
when ROW TO ARRAY is true, is translated to:
{
    "lat": [
        48.876684,
        48.876684,
        48.876684,
        48.876705,
        48.876705
    ],
    "lng": [
        2.175765,
        2.175765,
        2.175765,
        2.175806,
        2.175806
    ],
    "CH4": [
        1.94,
        1.95,
        1.92,
        1.93,
        1.99
    ]
}
otherwise, it is translated to:
[
    {
        "lat": 48.876684,
        "lng": 2.175765,
        "CH4": 1.94
    },
    {
        "lat": 48.876684,
        "lng": 2.175765,
        "CH4": 1.95
    },
    {
        "lat": 48.876684,
        "lng": 2.175765,
        "CH4": 1.92
    },
    {
        "lat": 48.876705,
        "lng": 2.175806,
        "CH4": 1.93
    },
    {
        "lat": 48.876705,
        "lng": 2.175806,
        "CH4": 1.99
    }
]
An example of table display of this CSV file is given here: csv-array-table-display.xprjson.
It combines a CSV file reader as well as a formula using the underscore.js library.
CSV file player
Acts as a player of CSV file. Its behaviour depends on the TIME INCLUDED parameter:
-
If set to false, play starts from the first row. On each SAMPLING TIME, the current row is output in JSON format and the pointer moves to the next row. See example csv-player.xprjson.
-
Otherwise (i.e. TIME INCLUDED), the first row is considered as a time vector.
Trip conversion
Accepts two input formats: JSON trip and GPX.
JSON trip
For example:
{
    "date": [
        0,
        0.9956660270690918,
        4.348928928375244,
        5.34580135345459,
        6.342041015625
    ],
    "latitude": [
        48.87377114008051,
        48.87375424584508,
        48.87375361580033,
        48.8737695152726,
        48.87374484625635
    ],
    "longitude": [
        2.181289913310362,
        2.18128885662239,
        2.181257680655494,
        2.181316252378676,
        2.181373139891087
    ]
}
GPX format
The trip is converted to geoJSON format (mainly as LineString). This is required if display is needed in a map widget.
- Example with JSON trip input, converted to geoJSON, and displayed in map: trip-conversion-view.xprjson
- Example with GPX input, converted to geoJSON, and displayed in map: trip-conversion-view.xprjson
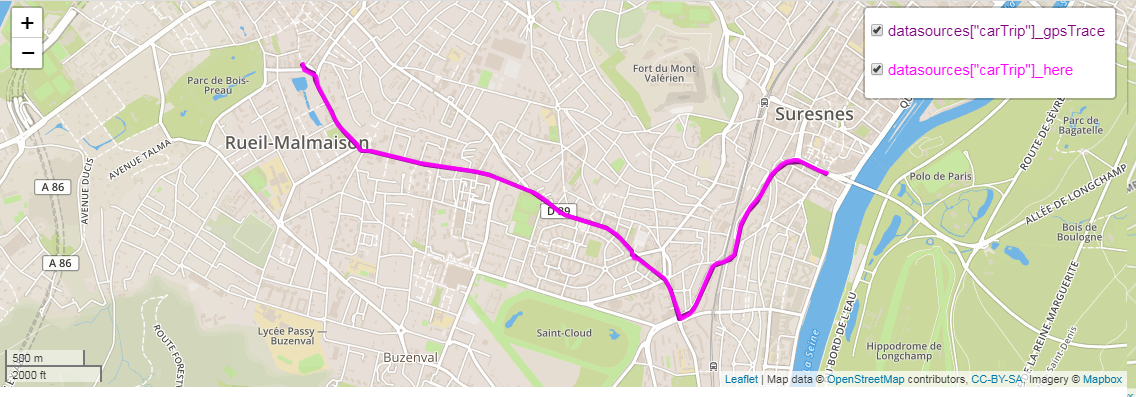
Map matching
Map matching (see definition in Wikipedia) dataNode is based on HERE route matching API.
See example: map-matching.xprjson.
 .
.
Delay
Applies a one-step delay to its input defined in the INPUT SIGNAL field.
On the first execution, its output is set to the JSON value defined in the INIT VALUE field.
Example with Clock and Delay : clock-and-delay.xprjson.
Clock
Gets the value of the JavaScript clock from the web-browser which is running the xDash app:
{
    "numeric_value": 1556898500713,
    "full_string_value": "03/05/2019 à 17:48:20",
    "date_string_value": "03/05/2019",
    "time_string_value": "17:48:20",
    "date_object": "2019-05-03T15:48:20.713Z"
}
Example with Clock and Delay : clock-and-delay.xprjson.
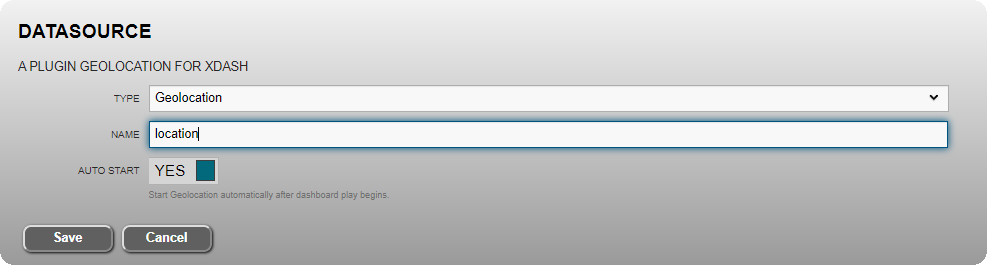
Geolocation
This dataNode (*) gets the current geographical position of the device, using the GPS sensors if available.
For privacy reasons, authorization is requested from the user to report its position. It also requires xDash to operate under the https protocole.
DataNode produces the following output.
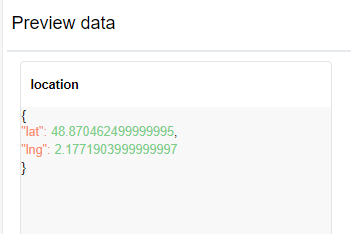
Its output value is updated automatically according to the device position and movement.
Example with Geolocation dataNode and Leaflet Maps widget which displays your location : osm-geojson-geolocation.xprjson (*).
WebSocket
These dataNodes (*) offers support for the WebSocket protocol, which is supported by most web browsers to offert real-time data exchange capabilities. It provides full-duplex communication channels over a single TCP connection. WebSocket in xDash is implemented as client. It needs to communicate with remote WebSocket server.
WebSocket receive
Acts as a WebSocket client receiver for xDash.
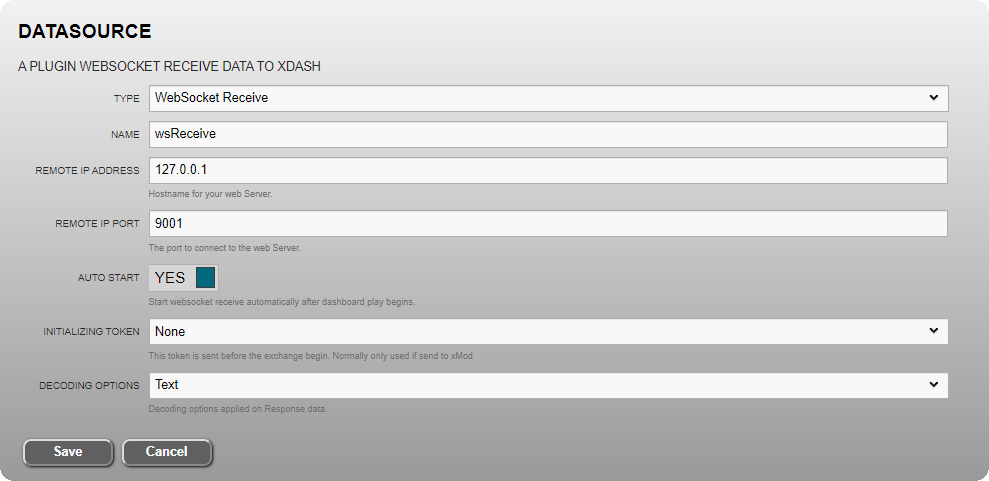
- Remote IP address : The IP address or host name for your remote WebSocket sender.
- Remote IP port : The port to connect to your WebSocket sender.
- Initialization token : Keep to None for most applications.
- None : nothing is sent to the web server during initialization of exchange.
- xMOD : support to xMOD software. The token "ws_init" is sent once to the xMOD WebSocket server during initialisation of exchange.
- Decoding options : decoding options applied on response data sent by your WebSocket sender.
| options | Description |
|---|---|
| JSON | Received data are in JSON format |
| Int8Array | Received data are an Array of integer 1 byte |
| Uint8Array | Received data are an Array of unsigned integer 1 byte |
| Int16Array | Received data are an Array of integer 16 bits |
| Uint16Array | Received data are an Array of unsigned integer 16 bits |
| Int32Array | Received data are an Array of integer 32 bits |
| Uint32Array | Received data are an Array of unsigned integer 32 bits |
| Float32Array | Received data are an Array of float 32 bits (IEEE 754 single precision) |
| Float64Array | Received data are an Array of float 64 bits (IEEE 754 double precision) |
| ArrayBuffer2String | Received data are an Javascript ArrayBuffer and transform to string inside xDash |
WebSocket send
Acts as a WebSocket client sender for xDash.
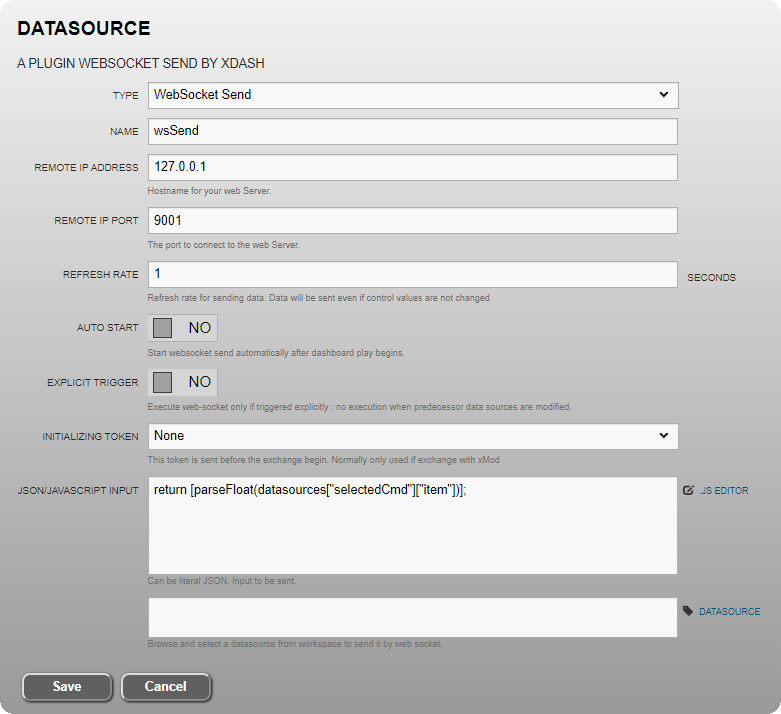
- JSON/JAVASCRIPT INPUT : The data sent by this dataNode to the WebSocket receiver. Data are sent without any modification. In the following example, the dataNode reads the value of "Item" property from the "SelectedCmd" dataNode and send this value to the remote WebSocket receiver as a 32-bit float.
Example
Follow instructions below to first build a WebSockets test server.
- Install Node.js from https://nodejs.org/
- Download Node.js server example simpleWS.js
- Install ws library used in simpleWS.js server
npm install ws - Run the WebSockets server
node simpleWS.js - The server should be ready and display the following message:
 * Open the websocket-demo.xprjson (*) example with xDash.
- Go to tab "3. Play".
- Test the communication with the server.
-
The server should display:
 * xDash should display: